IMPORTANT! Adafruit Feather 32U4 Bluefruit LE will not work with this PCB. Please use Pro Micro only.
So...this new do-it-yourself kit is an 18-key macro-pad with hotswap-pability and uses cheap pro micro OR a not so cheap Bluefruit LE of Adafruit micro-controllers. This macro-pad is intended for those who are new to mechanical keyboards, still searching for the perfect switch, and or, those that want wireless connectivity.
By design, the grid is a 4x4 plus 2(+1 only if Bluefruit will be used). Two of these keys can accommodate EC11 Rotary Encoders.
Aside from the Pro Micro, this PCB accepts Adafruit's 32U4 Bluefruit LE as its alternate controller. This will enable the PCB to be accessed via Bluetooth if paired with a Lithium Polymer (LiPo) battery. The casing I am currently designing can accommodate a battery with dimension 29mm x 36mm x 4.75mm (LxWxH). This size typically comes with 500mAh capacity if I am not mistaken.
In the above image, top or front of PCB, placeholder for micro-controllers are on the top left. Due to the orientation of the Bluefruit, a pin out for the battery was placed. The square one captures the positive polarity while the circle one is for negative.
Below the micro-controller placeholders, there are hybrid slots that can accept either an EC11 Rotary Encoder or an MX switch (through Kailh hotswap socket). If using a Pro Micro, the following are accepted combinations EC11 + EC11, EC11 + MX, MX + EC11, or MX + MX.
By design, the grid is a 4x4 plus 2
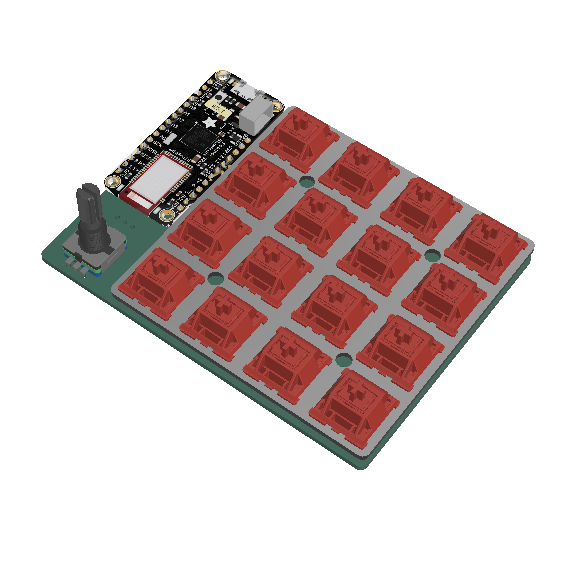 |
| A render with Bluefruit controller. |
 |
| Bottom view/render with Kailh sockets installed. |
The PCB
 |
| Top |
Below the micro-controller placeholders, there are hybrid slots that can accept either an EC11 Rotary Encoder or an MX switch (through Kailh hotswap socket). If using a Pro Micro, the following are accepted combinations EC11 + EC11, EC11 + MX, MX + EC11, or MX + MX.
Update 20200530: (layout options)
For PROMICRO


For BLUEFRUIT


Beside the above mentioned slots, there are pin outs for RGB LED strip or similar component. From top to bottom, the pins are for: GND DIN DOUT VCC. Position of this slot is clearly shown below.

PIN assignment for RGB LED:
- for Bluefruit: GND = GND; DIN = D1; DOUT = D3; VCC = VCC
- for Pro Micro: connect DOUT to D3 and DIN to any of the following available slots: B2, B3, B1, B7, D3, B5 (see reference guide/location or schematics below)

Below image shows an illustration of the bottom PCB. Battery and LED pin outs are clearly isolated from this view.
 |
| Bottom |
Looking at the switch components, this PCB makes use of Kailh's hotswap sockets for easy switch replacement. A through hole (THT) or surface mount (SMD) diodes may be used with this PCB. Additionally, a per-key RGB LED can also be achieved by installing a WS2812B Chip.
 |
| Schematics (updated) |
Update 20200507: I just noticed that, in this very first version - HSBLE18-01-1220, COL5 is not connected to any pins on the controllers. To address this issue, tapping needs to be done between COL5 and pin B3 of the Bluefruit. See photos reference below:

Top plate

Above is an illustration of the top plate that will come with this kit. These plates were made with FR4 material, same material as those used with the PCB.
 |
| These PCBs arrived with just a total of 9-days wait time from upload of design files. That's at least a week early than expected! Yay!! It did not come vacuum sealed nor with a free keychain/gift though :( |
Disclaimer: Due to the lockdown and inability to acquire needed components, there is currently no actual test conducted as of writing.
Here's a fusion 360 link for this kit's casing (a work in progress): https://a360.co/2w8lrJz
Update 20200411: Link to my qmk_firmware fork. See p18 for this PCB's configuration files.
Update 20200510: Three of my keyboards, including this, were already merged with qmk's github repository. YAY! To celebrate, I am releasing P20 gerber files! Please follow this link. I apologize for the bit.ly link, I just wish to track number of downloads/clicks. This will direct you to a zip file from my google drive. Please use this link if you wish to share. Thanks!
lovely project. if you are willing to ship worldwide (or europe at least), I'll buy for sure!
ReplyDeletehi leo! i can make arrangements after the community quarantine. send me an email if you are interested. my gmail handler is pabile. thanks and stay safe!
DeleteIs the code for this project posted somewhere?
ReplyDeleteare you referring to the configuration files? if so, yes. you can find it under official qmk_firmware repository under keyboards/pabile
DeleteWould you consider doing per-assemble order for a P18? I'm too new to get into DIYing bluetooth kits but really wants one for my daily works.
ReplyDeletehi johnson, i can do that but my PCBs are sold out already.
DeleteAre any of these available?
ReplyDeletehi pepper. i have no more stock. sorry.
DeleteIs it possible to buy the gerber?
Deletehmmm.... sell? no. share? why not. please follow this link: https://www.thingiverse.com/thing:4333236
Deletecheers and stay safe
Thank you for that. I do like the design and it will be a fun build for me. Question, I was trying to upload to PCBWAYS Gerber for price estimate and it said it was 4 layers and jlcpcb said 2 layers.
Delete